Joomla! one-click updateTrouble Shooting Guide for the Innato Update Services - J3

Preamble and disclaimer:
This page is regularly reviewed. Based on customer queries that we have received, we may expand or alter it as needed.
The information presented here is to be considered a basic guideline and is provided 'as is', without any form of warranty or guarantee. We accept no liabilities for using the informations on this page. The content of this page is subject to change without notice.


> This troubleshooting guide applies exclusively to the updating of extensions developed by and obtained directly from Innato BV.

FIRST...
You must have installed the Innato Updater system plug-in on your website. If this is the case, make sure it has been enabled (published).
If you do not have the Innato Updater plug-in installed, then look for the plug-in download link in the extension's description (Joomla! back-end of your website) and download/install/enable it; this is a one-off action.

SECOND...
Have you properly configured the extension that must be updated, so that it communicates your purchase details to our update server?
The most commonly made omission / mistake is that the documentation which is included in the downloaded extension is not read. Many of the requests for help that we receive can be simply answered by the famous initialism RTFM.
The documentation can be accessed by unzipping the downloaded extension file, or through a link in the extension's description at the back-end of your Joomla! website.

Some of the obvious solutions, even if already mentioned in the documentation, are included in the guidelines below.

Below is a summary of the events that may occur during the update process. Look carefully for the event(s) that you are encountering.

The information relates only to software using the Innato Update Service for paid extensions from Innato.
It does not apply to freeware/trial extensions from Innato nor to extensions from Innato that must be updated manually, as described here.

We take the Login One! Premium plug-in as an example. Click on the images to enlarge.

  • After you have installed the plug-in, you must configure it properly in order to use the Innato Update Service. Fill in your purchase details (order number plus the email address that was used for the purchase) in the appropriate fields under the 'Purchase Details' tab. Unless you uninstall the plug-in completely, this action is a 'once only'.
    NOTE: If the free update period has expired and you have subscribed to our update service, you still need to fill in the purchase details of the plug-in purchase, i.e. NOT of your update subscription.
Login One! plug-in Purchase Details tab
  • If you have not installed the Innato Updater system plug-in, or you have disabled it, you will see an error notice when you attempt to update. The notice reads "Error updating COM_INSTALLER_TYPE_TYPE_.", as in the image at the right.
Error when Innato Updater plug-in not installed
  • A download link to the Innato Updater plug-in can be found in the description (Joomla! back-end) of the extension that you have installed, see image at the right.
    If there is no download link for the Innato Updater, then the extension is not (yet) using the Innato Updater; it must be updated manually, as described here.
Description tab includes download link to the Innato Updater plug-in
  • If you have installed and enabled the Innato Updater and something went wrong with the update - for example, you have not configured your purchase details - you will see a notice as shown at the right.
    The notice includes a link to this troubleshooting guide, a link to manually check for updates and a link to an informational page which may give more details of the problem.

    Below are two examples of informations presented in the above mentioned 'informational page':
Update error notice from Innato Updater
> You have not configured your purchase details. The updater doesn't know which purchase order to look for. Innato Updater informational page. You have not configured your purchase details.
> You have configured your purchase details, but the order number cannot be found. Please double-check your order details. You must use the order details of your plug-in purchase, NOT of your update subscription, if any. Innato Updater informational page. The configured order could not be found.

Joomla! update errorYou are trying to update one or more extension(s) and the above mentioned error notice appears. Some or all of the extensions seem to have not been updated. This notice is a very general one, without further detail, and something has obviously gone wrong. There may also be a warning notice saying "Update path does not exist".

Possible causes:

  • This is the standard Joomla! behaviour if the update(s) has (have) failed. Maybe you have not installed and enabled the Innato Updater plug-in (only for extensions from Innato BV).
  • The Innato Updater plug-in is not the most recent version.
  • The involved extension from Innato is not the most recent version.
  • Your device or website may be behind a firewall that is blocking the update.

Solution:

  • If you have done so already, install and/or enable (publish) the Innato Updater plug-in and try again to update your extension(s). A download link to the Innato Updater plug-in can be found in the description (Joomla! back-end) of the extension that is to be updated. If updates fail again, you should see an error notice that includes a link to a self-explanatory page which will guide you further.
    If the error message starts with "Failed to extract file: ", followed by a file name, probably ending with "html", you may try to visit the following URL in your browser: <the base URL of your website>/tmp/<file name>
    For example, if the error message reads "Failed to extract file: innato_delete_this_file.html", you should try to visit the following URL: http://yourdomain.tld/tmp/innato_delete_this_file.html (please replace the 'first bold part of the URL by your domain name). If you visit the URL, you may be able to see what the update problem is.
  • Check if your install of the Innato Updater plug-in is the most recent version; update it if not.
  • Check if your install of the involved extension from Innato is the most recent version; update it if not.
  • If you have no time to troubleshoot, you may update the plug-in manually, by clicking the 'is this the latest version' link in the authentication plug-in description. See here.
  • Contact your local IT Help Desk and ask them whether your device or is behind a firewall that is blocking the update. If so, ask them to fix it.
  • If all the above does not work, please contact us for support and provide the following details of the Innato extension to be updated: product name, order number and the email address that you have used for the purchase order of the extension (not of the Innato Updater plug-in).

See the above number 2.

  • Please check if your Innato extension is compatible with your Joomla! and PHP versions. See the extension's documentation or information on this website for the minimum requirements.
  • Contact your local IT Help Desk and ask them whether your device is behind a firewall that is blocking the update. If so, ask them to fix it.


10 January 2023

One-click updateInnato Update Services for commercial (paid) extensions - J3

We are converting our commercial (paid) Joomla! extensions to facilitate the Joomla! 'one click' update system, which is additionally supported, customised and optimised by our proprietary online software (Innato Update Services).
It is still possible to download and install updates manually.

The above means that the release of new software updates will be monitored by the Joomla! core software of your website, for your convenience. You will no longer need to remember to regularly click the "check for updates" link in the extension's description (Joomla! back-end), in order to see whether an update has been released. Nor do you need to download and install updates manually.

To make our Innato Update Services work, you will have to:

  • download and install the Innato Updater plug-in, which is available - free of charge - through a link in the description of the extension at your Joomla! back-end. If there is no download link, you do NOT need the Innato Updater (yet).
    Installing the Innato Updater plug-in is a one-off action; one single updater install will support all commercial (paid) extensions from Innato. You will not need the Innato Updater plug-in for our freeware extensions;
  • enter some purchase details of your paid extension into the configuration of the extension that shall be updated through the Joomla! update system. Detailed information is available in the extension's Manual (link in the extension's description - Joomla! back-end).

> A troubleshooting guide is here.

> If you need additional information or help, please contact us. Please note that our support is subject to the Terms of Support for the extension. A link to these terms can be found in the extension's description at the Joomla! back-end. Please provide your order number when contacting us.


How to keep your Innato software updated?

Our freeware extensions for Joomla! 3.x are updated through the Joomla! 'one-click' Update System.
An increasing number of our commercial (paid) extensions for Joomla! 3 is updated through the Joomla! Update System, which is additionally supported, customised and optimised by our proprietary online software. For all extensions, the 'manual update' option described below is included as well. More detailed information is in the extension's Manual.

Our Joomla! extensions are provided with a 'version check' link in the extension management screen (back-end, tab 'Description'). See the example below.
Click on the link and you will be taken to our website. Then follow the instructions on the screen.

Software version check

GlobeWeather moduleBasic install and setup instructions for GlobeWeather for Joomla! 3.x

This information is to be considered a basic guideline for the standard edition and is provided 'as is', without any form of warranty or guarantee.
Your Joomla! installation and setup may be different from the basis for these instructions.

Instructions are also included in the module's download package.

Install and upgrade via Joomla! back end. Your settings will be kept.
Javascript must be enabled and up-to-date. 

1. Prepare yourself
Find the weather station ICAO code(s) of the location(s) you wish to display. The ICAO code consists of four alphabetic characters.
If your location is not listed, choose a nearby location.

> Worldwide metar code list
The ICAO code is in the column next to the station's name/description.
Please note that there may be obsolete entries in the list, i.e. stations that do not any longer transmit usable metar data.
The most recent version can be viewed here.


2. Module Manager / Tab'Module'
Enter the station code(s) of your location(s) at "Metar stations". Separate by commas. Remember the number of stations that you have entered.

Enter the name or descriptions of your stations at "Metar stations description". Separate by commas and make sure the number of descriptions equals the number of stations.

Enter the time zone vs UTC (GMT) for each station. Use the time zone without daylight saving time. Separate by commas and make sure the number of time zones equals the number of stations. For stations at UTC time, e.g. London, enter a 0 (zero).

'Local time offset to UTC'. Recommended setting is 'Use Global'.
Otherwise, select the time offset of your local time relative to UTC. Correct here for daylight saving time if applicable. If you are building a website for a different time zone than your own, use your client's time zone as the basis for this setting.

GlobeWeather Standard module options
   

3. Module Manager / Tab 'Advanced'
At first instance, leave the "Metar retrieval mode" to its default setting (HTTP).
If the data continue to take long to load, try to change it to FTP.
If you get a data transfer error, first check your read/write permissions (see Manual, section 5). If the problem persists, then change this setting to FTP and try again.

Some ISPs block either HTTP or FTP transfer (or both?). Contact your ISP if neither retrieval mode appears to work.

'Station selector button'. You can select either "black" or "white", depending on the background colour of your webpage.

The Premium and Business Editions offer many more configuration options. See here.

GlobeWeather Standard module advanced options
   

4. Module Manager / Tab 'Module'
Publish the module and assign its position in your template.

5. Module Manager / Tab 'Menu Assignment'
Finally, assign the module to the appropriate pages.

Save the module settings.

GlobeWeather Standard module details 1GlobeWeather Standard module details 2
   

6. Frontend / Test GlobeWeather

GlobeWeather will try to set the metar cache permissions by itself. If you see a GlobeWeather error message related to the metar cache, please read the instructions in the documentation that comes with the downloaded package.

AttentionBE PATIENT! It may take up to 30 minutes before all metar data have properly settled.

MambWeather Classic iconGlobeWeather icon Klear KweatherGlobeWeather icon SerradinhoGlobeWeather icon Tick

Enjoy !!

USAGE NOTES

After you installed the module and set your parameters, it may take a while before you see the desired output, due to metar data retrieval, cache and browser settings.
Be patient. It may take up to 30 minutes before your weather data are shown properly. You may help the process by clearing both the Joomla! and browser cache and by closing and refreshing your browser.
Weather station metar data are generally updated twice an hour.

Sunrise and sunset times
You will have to periodically adapt the sunrise and sunset times to the season of the year, that is if you want to keep the day/night icons realistic. This regular adjustment (tab 'Module') is not necessary with the Premium and Business editions which will automatically calculate and adjust the sunrise/sunset times (AutoCalc).

Warning icons
Disconnected
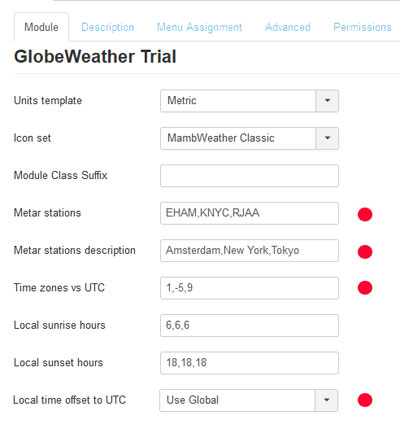
If you see an "unplugged" icon, with temperature indicating "---", the weather data file may have become corrupt or no weather data are available for the station. Some stations in the ICAO list do not (any longer) provide usable metar data.
GlobeWeather will re-load the involved data file(s) every 5 minutes. If the problem persists, the station is most likely not providing usable metar data. If all stations show an "unplugged" icon, you may need to change the metar retrieval mode (HTTP or FTP, see under 3).

Broken calendarWhen a station has a metar available, but has not updated it within an acceptable period, you will see the latest weather data with the weather icon overlayed by a broken calendar. The event may remain unnoticed if you have decided not to display the weather icon.

A troubleshooting guide is here.

ABOUT LANGUAGES

Frontend languages:
A language pack can be downloaded here.

Backend languages:
English only.

Hello spam click here