GlobeWeather moduleTROUBLESHOOTING GUIDE
GlobeWeather for Joomla! (all Joomla! platforms)


Preamble:
This information is to be considered a basic guideline and is provided 'as is', without any form of warranty or guarantee.
This troubleshooting guide applies to the current GlobeWeather editions and versions.
Your Joomla! installation and setup may be different from the basis for these instructions.

PROBLEM INSTALLING GLOBEWEATHER
Occasionally, a problem with the installation of GlobeWeather with Joomla! 1.6 has been reported. Disabling the Joomla! FTP layer may help. See our forum topic.
There may also be an upload file size limit for your website (may be as low as 2M). If so, you may need to contact your ISP to increase this limit.

The remainder of this Trouble Shooting Guide assumes that the installation went OK.

CHECKS YOU MUST ALWAYS DO FIRST
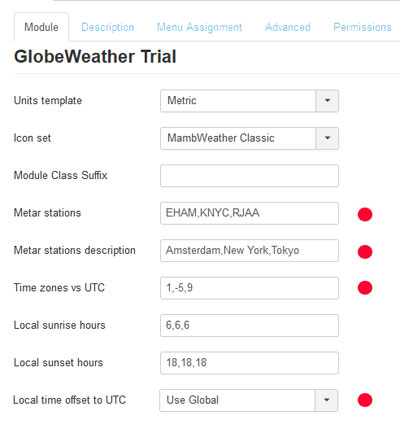
The most commonly made mistakes are in the following basic parameters entered in the module's setup (backend Module Manager, Basic Options). So check these first!

- Are you using the latest version? There is a 'version check' link in the module management screen (back-end), under Description. Look for "Is this the latest version? Check it here".

- Have you entered the correct station ICAO codes? They should be four characters each.

- Look at the NUMBER of station codes that you have entered. They must be comma-separated.

- There must be an equal NUMBER of entries for the following options:

  • Station descriptions;
  • Station time zones;
  • AutoCalc options (where the "Y"s are). Premium and Business Edition only;
  • Local sunrise and sunset hours.

- Also check your local time offset. This setting does not impact performance, but is used for the weather details list. 

OTHER PROBLEMS
You have taken care of the above and the module is still not working.
If you see error messages related to the metar cache, see the instructions in the documentation that comes with the downloaded package.

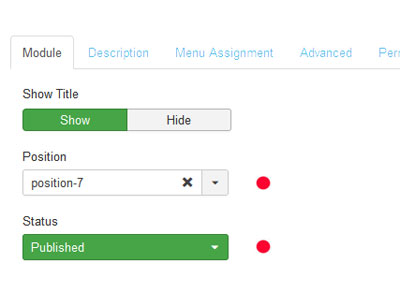
Possible cause: The module has not been properly published.
Possible solution: Back-end. Check the module status (should be 'Published') and whether template position, access and module Menu Assignment have been set correctly.

Cause: Your website's PHP install has not installed or enabled the ftp extension.
Possible solution:

a. If you have access to phpinfo(), check if 'ftp support' is present and set to 'enabled'. Or, if you have access to php.ini, look for the entry ';extension=ftp', remove the semicolon (;), save the file and restart php.

b. If you have no access to php.ini you must contact your provider and ask for the php ftp extension to be installed/enabled.

Cause: You may have changed one or more settings, but the module is using cached content.
Possible solution:

a. Use the station selector to select this (or another) station again. Doing so - more or less - resets the module. You may need to expand the details list to see the station selector.

b. Wait until the weather data are refreshed, typically each 30 minutes.

Possible cause: The configured time zone of your website is incorrect.
Possible solution: Check the configured time zone of your website at the admin back-end: System / Global Configuration / tab 'Server' / under 'Location Settings' look for 'Website Time Zone'.

Possible cause: Default module CSS styling of your website is faulty, incomplete or missing.
Possible solution: Enter '_globeweather' (without the quotes) as the Module Class Suffix in the back-end Module Parameter list. If this does not help, you can use '_globeweather' as the Module Class Suffix and modify the CSS styling (file /modules/mod_globeweather/mod_globeweather/css/globeweather.css). There is plenty of information on the internet about CSS styling.

disconnectedMeaning: No weather data could be retrieved.
Possible causes and solutions:

In GlobeWeather Premium and Business, you can activate the Diagnostics function (Advanced Options) to better trace the problem.

a. There is a temporary problem with the station's data transmission. Try again 10 minutes later.

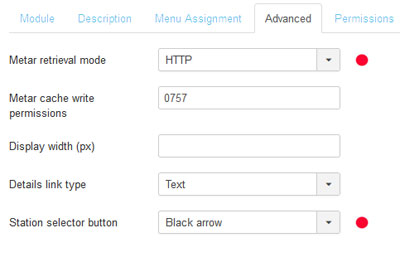
b. The data retrieval mode (HTTP or FTP) has been set incorrectly. If this is the cause of the problem, you should see the disconnected icon with every station that you have configured. Change the data retrieval mode and try again after 5 minutes when the data file cache has expired. GlobeWeather Premium and Business Editions include the Auto Detect-SmartMetar function and will attempt an alternative retrieval mode automatically; For Premium and Business, "Auto Detect" is the recommended retrieval mode.

c. The HTTP or FTP timeout may be set too tight for your website (Advanced Options). Set to higher value.

d. The station does not exist. Check the station's four-character ICAO code that you have entered. You can use the website https://www.aviationweather.gov/metar to see if the station exists.

e. The station does not transmit weather data in the right (metar) format. You can use the website https://www.aviationweather.gov/metar to find out if metar data exist for this station. See also under 12.

f. If you have tried all the above options and none are working, your ISP has probably blocked both the HTTP and FTP access to external websites. If this is the case, there is nothing you can do except asking your ISP to enable either HTTP or FTP access. Upgrading to GlobeWeather Premium or Business Edition will NOT solve the problem.

broken calendar overlayedMeaning: Weather data have been transmitted, but were recorded more than 6 hours ago.
Possible causes and solutions:

a. The station has not updated its data yet, or is not transmitting data on a regular basis (standard is approximately every 30 minutes). There is nothing you can do except be patient and hope for a more recent update of the weather data.

b. The station has meanwhile stopped transmitting weather data but its last transmission is still made available. Configure a different station nearby.

calculator overlayedMeaning: AutoCalc not possible.
Possible causes and solutions:

a. Most likely: Time zone for the station set wrongly, so that the calculated local sunrise time appears later than sunset time (e.g. sunrise 18:45 and sunset 06:45, the latter is in fact next day).

b. Station position (lat long) out of range, i.e. extremely north or south. Disable AutoCalc for this station (see instructions).

c. Station has endless day or night. See the instructions (SUNRISESET_HOURS) how to configure this.

d. Station coordinates (lat long) unknown. Update the weather station list to its latest version (see SUNRISESET_HOURS). If this does not solve the problem: disable AutoCalc for this station (see instructions).

e. The file containing worldwide stations' codes and positions is missing. Re-install Globeweather on top of the current install.

The scrolling ticker line should have the following format:
- First it may (or may not) start with a weather icon;
- Next is the name of the weather station;
- Next a space then the temperature number plus unit (°C or °F) followed by a space;
- Next three plus signs +++ but only if there is a following station
- and then, if there is any, the next station's details, starting again with (or without) a weather icon.

So, an example without weather icons would look like: Amsterdam 20°C +++ New York 24°C +++ South Pole -28°C

If you see a different format on your website, the module's configuration is probably not correct or not complete. Please see the documentation which is included in the downloaded install package.

Possible cause: The weather data take long to (re)load OR cannot be loaded at all.
Possible solutions:

In GlobeWeather Premium and Business, you can activate the Diagnostics function (Advanced options) to better trace the problem.

a. You may have selected a wrong or less suitable metar data retrieval mode. Change it in the Advanced options. For GlobeWeather Premium and Business, the recommended mode is "Auto Detect". If you have already selected the AutoDetect retrieval mode, please allow a few days for our proprietary SmartMetar technology to optimise its settings.
Business Edition only: If the module never seems to (re)load, look at the 'Metar retrieval options' (Advanced options) and remove one option at the time and refresh the front-end page after every single removal; the metar data provider may have disabled a specific retrieval protocol.

b. Premium and Business Edition only: You may have enabled the diagnostics option (the text "Diagnostics ON" appears). Disable it.

c. Unlikely, but could happen: Your ISP has changed HTTP/FTP data transfer permissions. GlobeWeather freeware edition: see above, under a. GlobeWeather Premium and Business: Reset the SmartMetar function as follows: (1) Select either HTTP or FTP as the data retrieval mode (Advanced options). (2) Save the parameters and refresh the frontend page. (3) Re-select AutoDetect as the data retrieval mode (backend) and save the parameters.

Cause: The station is not transmitting weather condition data.
Possible solution:

a. Configure a different station nearby.

a. Find the station's ICAO code (four characters). Use for example Greg Thompson's metar list on http://www.rap.ucar.edu/weather/surface/stations.txt

b. Enter and submit the station's ICAO code in the small "Request METAR data" form on the website https://www.aviationweather.gov/metar

c. If you see a string of characters and digits in the line below "Data at...", the station has transmitted weather data. The first part of the string is the data record date.

Metar data have a specific and defined format. You can find a lot of information about the subject on the internet.

An example of metar data as retrieved from the NOAA website is the following string:
2011/04/14 09:55 EHAM 140955Z 22004KT 160V300 9999 SCT015 10/07 Q1019 NOSIG

The string starts with date and time (UTC). Next the station code ("EHAM" for Amsterdam Airport). The part "140955Z" is a contraction of day (14th), time (0955) and 'Z' which stands for 'Zulu time' (this is UTC). What follows are the weather data for the station.
The important part of the metar are the station code ("EHAM" in this example, sometimes preceeded by the word "METAR") and what follows. GlobeWeather stores the metar without the first two components of the above string (i.e. without date 2011/04/14 and time 09:55).

Possible cause: The submit button has (nearly) the same colour as the background.

Solution: Under Advanced Options, you can configure either "black" or "white" for the station selector button. Select the option that best suits the background colour of your webpage.

Possible cause: Javascript not enabled or not up-to-date.

Possible cause: Using the freeware edition with multiple instances of the module installed, on the same or different page(s).

Solution: Get yourself the Premium or Business edition, these support multiple instances of the module.
When having two or more instances on the same page, the weather data scrolling marquee of only one instance will be shown. This is the only limitation.


Innato BV
19 Dec 2021

Login One! plug-inTROUBLE SHOOTING GUIDE FOR LOGIN ONE! PLUG-IN
Login One! plug-in for Joomla! 3.x


Preamble:
This page is regularly reviewed. Based on customer queries that we have received, we may expand or alter it as needed.

The information presented here is to be considered a basic guideline and is provided 'as is', without any form of warranty or guarantee. We accept no liabilities for using the informations on this page.

This troubleshooting guide applies to all current Login One! editions and versions.
Authentication plug-ins are criticial pieces of software and your Joomla! installation and setup may be different from the basis for these instructions.

CHECK YOUR VERSION
Before anything else, make sure that you are using the latest version.
Versions 3.4.0 and 3.4.1 (both Premium and Business editions) may produce erroneous update notices, so you should update these versions immediately.
There is a 'version check' link in the plug-in management screen (back-end), under Description. Look for "Is this the latest version? Check it here".

MOST COMMON OMISSION / MISTAKE

The most commonly made omission / mistake is that the documentation, which is included in the downloaded package, is poorly read or not read at all. At least half of the requests for help that we receive can be simply answered by the famous initialism RTFM.
Some of the obvious solutions, even if already mentioned in the plug-in documentation, are included in the guidelines below.

There is a separate troubleshooting guide for this topic, see here.

After you have completed the order & payment procedure, a confirmation message is displayed on the screen and an email containing a download link is sent immediately. If you do not receive our email within half an hour, something is wrong.

Possible causes:

  • You have not properly completed the order & payment procedure.
  • You have used an email address which differs from the email address that you have checked.
  • You have used an invalid or non-existing email address when you completed the order.
  • Our email has ended up in your Spam folder.
  • There may have been a problem with the email server, either our or your.

Possible solutions:

  • Check the Spam folder of your email client.
  • If you have created an account with us, log into your account and check your order(s) as follows:
    > Log into your account, click here.
    > Check your orders: User Menu / Your account & orders / Your orders.
    >
    Click on the order number, then scroll down and click on the download link (this does NOT work for updating your software).
  • If you do not have an account with us, or the above procedure does not work for you:
    > Check the other email address(es) that you may be using.
    > Make sure that the email address which you have used does indeed receive emails (by sending a message to yourself). If not, please contact us for support (provide the ordered product, the order date and the email address that you have used for the order).
  • If none of the above works, please contact us for support and provide the ordered product, the order date and the email address that you have used for the order.

When the install package size exceeds the maximum allowed upload size set by PHP, Joomla! will throw an error and the plug-in package will not be installed.

Cause:

  • The install file size exceeds the configured maximum of the PHP upload size of your website or ISP.

Solution:

  • If you have access to the PHP configuration, increase the settings of upload_max_filesize and post_max_size in the file php.ini, OR contact your ISP to do this for you.
    This is the recommended solution, because the install package size is not really that big, so you will likely experience this problem with other extensions as well, sooner or later.
  • Workaround if the above solution fails: remove the documentation (PDF) files from the installation (ZIP) file and retry. Make sure to keep a copy of the original installation file!

After having installed and enabled the plug-in (see documentation), you should check - BEFORE you log out from the back-end - whether you will not be locking yourself out from the front- and back-end:

  • While leaving the back-end open, open the website's home page (front-end) in a separate tab or window, for example by clicking the Preview or View Site link at the top of the back-end page.
  • Log into the home page (front-end), not necessarily as an administrator, and log out again.
  • If you see no errors upon logging in or out, you are OK. You may log out from the back-end.
  • If you see errors upon logging in or out, disable both the Login One! authentication and user plug-ins and enable the standard Joomla! authentication and user plug-ins instead. The Login One! plug-in is not functioning correctly.

If your plug-in is updated through the Joomla! 'one-click' update system, please see here.

Authentication plug-ins can be critical and on top of this, the Joomla! 3.x core software has seen several significant revisions since its first release. Some of these revisions affect the user log-in process and therefore the Login One! plug-in.

We want to make sure that our software performs to expectation. We have temporarily restricted the installation of the Login One! plug-in to the Joomla! versions that we have tested and verified, so that the chances of locking yourself out from your website are minimised.

Possible cause:

  • The plug-in version that you are trying to install has not (yet) been verified and released for the Joomla! 3.x core version that you are using.

Possible solution:

  • Check your version of the plug-in and update both the authentication and the user plug-in if possible and necessary.
  • If you already have the latest version, check again later for a new update.

How to check your version:

  • In the authentication plug-in description, next to the plug-in logo, you will find the following text: "Is this the latest version? Click here". Click the "here" link and you will be taken to our web page.

You can't get access and you are seeing a notice telling you that your username/password are wrong or that you do not have an account.

Possible causes:

  • You have most likely not carried out the After installation check mentioned under 4.
  • If you see an error saying "Could not load authentication libraries", you have probably disabled the standard Joomla! authentication plug-in while not having enabled the Login One! plug-in OR you have disabled/uninstalled the Login One! plug-in and forgot to enable the standard Joomla! authentication plug-in (see Manual, section 'Uninstalling the plug-in').
  • You are not using the latest version of the plug-in.

Possible solution:

  • If you are still logged into the back-end, it's your lucky day. Check the version of the plug-in and update both the authentication and the user plug-in if necessary. Then make sure that both the Login One! authentication and user plug-ins are enabled.
  • If you have logged out from the back-end and can't get back into the back-end, there is no other way than to regain access by directly editing the MySQL database of the website, see Regaining back-end access after lock-out. After this, you can enable the Login One! authentication and user plug-ins through the back-end.

Even after waiting ages for the other session to expire, you can't get access to your website and the Login One! plug-in continues to notify you that multiple log-ins are not allowed.

Possible causes:

  • Another session using the same user credentials is still open and the other session is either still active or the website has been configured with a very long session life time.
  • The website does not have the overrides installed and the standard Joomla! install keeps the other session alive even if it's not active any longer (see here for more info about this behaviour).
  • You are using the freeware Trial Edition of the plug-in, which also blocks a second log-in by the same user, on the same device (i.e. it always operates under Strict Mode, see below)..
  • You are not using the latest version of the plug-in.

Possible solutions:

  • Reduce the session life time in the website global configuration.
  • Install the overrides (Premium and Business Editions only). The Login One! freeware editions do not have the override option.
  • If you are using the freeware Trial Edition, consider purchasing the Premium Edition or the Business Edition of the plug-in. These include the configuration option to set the so-called Strict Mode to NO, which allows multiple concurrent log-ins by the same user on the same device.
  • Check the version of the plug-in and update both the authentication and the user plug-in if necessary.

The following applies to the Business Edition only.
Despite that you have configured the 'maximum allowed sessions' to a value of 2 or greater, the plug-in is blocking all multiple log-in attempts.

Possible cause:

  • You have not configured any allowed user groups, meaning that no user groups and therefore no users are allowed to have multiple log-ins. This is the default behaviour of the plug-in.

Solution:

  • Configure the option named 'Allowed user groups' (near the top) and select there which user groups will be allowed multiple log-ins according to the set 'maximum allowed sessions'.
    NOTE: Including the user group 'Public' in the selection will disable the option.

Only the freeware/trial edition of the plug-in has a link to the Innato website in the 'log-in blocking notice'. The paid editions (Premium and Business) include the option to configure your own notice, in your own language.

The plug-in is rightfully denying access to multiple log-in attempts, but the notification that multiple log-ins are not allowed is not displayed at the front-end.

Possible causes:

  • Your website is using a template that does not have the system messages included correctly.
    If the website is using the standard Joomla! login module, you can check this by logging in while using 'gibberish' credentials, e.g. username xxx and password xxx. You should see a message saying that your credentials are wrong. If not, the front-end template is likely the problem.
  • It is not the Login One! plug-in but some other extension that is denying access.

Possible solutions:

  • Modify the template to properly include system messages.
    The body should include the code <jdoc:include type="message" />
  • Enable the standard Joomla! authentication and user plug-ins. Then disable the Login One! plug-ins (both authentication and user) and check again.

Possible cause:

  • The user being blocked has been assigned to two or more User Groups and the option User Group Priority is set to 'most restrictive'.

Possible solution:

  • Allow multiple log-ins to the other User Group(s) as well, OR set the related User Group Priority to 'least restrictive'.

Possible causes:

  • You are using a Super User account. Super Users are never blocked.
  • You are using an account that has been assigned to two user groups, one of which is the Super User group. Addition for Premium and Business Edition only: AND you have set the User group priority to 'least restrictive'.
  • The authentication plug-in has not been enabled/published.
  • You have not disabled the standard Joomla! authentication plug-in.
  • You are not using the latest version of the plug-in. Check the version of the plug-in and update both the athentication and the user plug-in if necessary.
  • The plug-in scope has been set incorrectly, for example to 'back-end only'.
  • Your account has been allowed multiple log-ins, see plug-in configuration.
  • You are logging in from the same workstation while the plug-in Strict Mode has been set to NO.
  • The authentication plug-in is not fired first; put it at the top of the plug-in list.
  • Something went wrong during plug-in download and/or installation: download and/or install both the complete plug-in package again.

Possible causes:

  • The Joomla! Session Handler configuration has been set to "PHP" or "None".
  • You have changed the plug-in configuration while a user was logged in.

Possible solutions:

  • Set the Joomla! Session Handler to "database" (Back-end admin / Global config / System).
  • Allow for some time for a new configuration to settle.

Possible cause:

  • The installed Joomla! update has probably changed the user log-in/log-out process in a way that is not compatible with the Login One! plug-in. For this reason, we recommend to always check and update the plug-in BEFORE updating the Joomla! core.

Possible solution:

  • If the plug-in is now locking you out from the back-end (you see an error or the notice that your credentials are wrong), try to get access to the back-end through a Super User account. If this does not help, then see under Regaining back-end access after lock-out.
  • If the plug-in is not locking you out from the back-end, but is merely performing incorrectly, then check for plug-in updates and install the latest updates if available. If things are still not OK, you may check the other cases in this guide, or have a look at the plug-in documentation, or have a look at the forum, or contact us for support (Premium and Business Editions).

Possible cause and solutions:

  • This is the correct behaviour of the Standard (freeware) Edition

The following is for the Premium and Business Edition only:

  • You have not installed the so-called override or the current override has become inactive because you have updated the Joomla! core software. Log into the front-end with Super User credentials, then log out and try again with the other account. If this doesn't work, uninstall and re-install the Login One! override, see documentation.
  • The current override may have become inactive because you have installed/updated a 3rd party login extension. Uninstall and re-install the Login One! override, see documentation.

The following applies to the Business Edition only.
You have configured the plug-in notification to NOT show the notification part 2 that specifies the remaining waiting time; despite this, the message is still being shown.

Possible cause and solution:

  • This option has been introduced with Joomla! version 3.6.1 and bugfixed in plug-in version 2.3.0. Solution: Update your Joomla! core to 3.6.1 or higher, preferrably to the latest Joomla! version and update the plug-in to version 2.3.0 or later.

You are going to add a new user or edit a user at the back-end and the following notice is displayed:
"Trying to get property of non-object in <your Joomla! path>\administrator\components\com_users\models\user.php on line xxx".

Possible cause:

  • Joomla! attempts to access the parameters of the Joomla! user plug-in, but this plug-in has been disabled as part of the Login One! setup.

Possible solution:

  • Update your Joomla! to version 3.7.4 or later.

If all the above does not apply or has not solved the problem, then you may want to try this.

Possible causes:

  • Your Joomla! install may be using the PHP Session Handler.
  • Your PHP version is outdated.
  • You have changed the plug-in configuration while a user was logged in.
  • There is a bug in the extension.

Possible solutions:

  • Check how the Joomla! Session Handler has been configured. The setting can be found (and changed) at the back-end under Global Configuration / tab System / Session Settings.
    If you set the Session Handler to 'Database', the problem may be gone. If the Session Handler has already been set to 'Database', then do NOT change it.
  • Use a newer PHP version. Many ISPs provide an option in their admin panel to select the PHP version.
  • Allow for some time for a new configuration to settle.
  • Please contact us and tell us what you have observed. Do not forget to include your Joomla!, PHP and extension edition and version.

If you are using the Standard (freeware) Edition, you can skip this, because the freeware edition does not have the Login One! override.

  • Log into the front-end with user credentials that are not allowed simultaneous sessions.
  • Log into the front-end website with the same user credentials but using a different browser.
  • You should see a notification saying that the second log-in has been denied.
  • If the last sentence of this notification specifies a waiting time (in minutes), then the Login One! override is active.

    Note: The plug-in scope configuration must include the ‘front-end’.

This is a last-resort option, if anything else has failed.
You will need MySQL access to the database of the involved Joomla! website.

  • Use MySQL Admin, phpMyAdmin or another MySQL program to connect to the website database.
  • Open the table named prefix_extensions. The word prefix will have been replaced by some code.
  • Look for the extension named plg_authentication_joomla (folder named authentication), get into the edit screen for this record and set the enabled field to 1. Save the record.
  • Next, look for the extension named plg_user_joomla (folder named user), get into the edit screen for this record and set the enabled field to 1. Save the record.

You have now re-enabled the standard Joomla! access plug-ins. Try if you can get access to your website.

If you still can't get access, then you must additionally disable the Login One! plug-ins in a similar procedure:

  • Connect to the Joomla! database and open the table named prefix_extensions.
  • Look for the extension named Authentication - Login One! (or similar, in the folder named authentication), get into the edit screen for this record and set the enabled field to 0 (zero). Save the record.
  • Look for the extension named User - Login One! (or similar, in the folder named user), get into the edit screen for this record and set the enabled field to 0 (zero). Save the record.
  • There may also be an extension named System - Login One! (or similar, in the folder named system), get into the edit screen for this record and set the enabled field to 0 (zero). Save the record.

Your website has now been configured as if the Login One! plug-ins have not been installed.
If you still have no access, front- or back-end, the problem lies somewhere else, i.e. not with the Login One! plug-ins.

If you feel that a useful feature is missing from the plug-in or if you have a suggestion, please contact us.

  • When you contact us, please tell us which product is concerned and describe the feature or suggestion. Include some level of detail (what should the feature/suggestion do and how would it help you?).

If you are experiencing an issue that is not listed in this guide, please contact us.

  • When you contact us, please tell us which product and Joomla! platform (J25 or J3) is concerned and describe the issue/problem that you are encountering. Include some level of detail (what were you trying to do and what was the response?). Just saying 'It does not work' is a complete waste of your time.
  • For the paid editions (Premium and Business) we ask you to also include your Order Number (or the purchase date) and the Order Email (the email address that you used when purchasing the plug-in).


28 Aug 2021

Login One! plug-inTROUBLE SHOOTING GUIDE FOR LOGIN ONE! PLUG-IN
Login One! plug-in for Joomla! 1.6 / 1.7 / 2.5


Preamble:
This page is regularly reviewed. Based on customer queries that we have received, we may expand or alter it as needed.

The information presented here is to be considered a basic guideline and is provided 'as is', without any form of warranty or guarantee. We accept no liabilities for using the informations on this page.

This troubleshooting guide applies to all current Login One! editions and versions.
Authentication plug-ins are criticial pieces of software and your Joomla! installation and setup may be different from the basis for these instructions.

CHECK YOUR VERSION
Before anything else, make sure that you are using the latest version.
There is a 'version check' link in the plug-in management screen (back-end), under Description. Look for "Is this the latest version? Check it here".

MOST COMMON OMISSION / MISTAKE
The most commonly made omission / mistake is that the documentation which is included in the downloaded package is not read. At least half of the requests for help that we receive could be simply answered by the famous initialism RTFM.
Some of the obvious solutions, even if already mentioned in the plug-in documentation, are included in the guidelines below.

After you have completed the order & payment procedure, a confirmation message is displayed on the screen and an email containing a download link is sent immediately. If you do not receive our email within half an hour, something is wrong.

Possible causes:

  • You have not properly completed the order & payment procedure.
  • You have used an email address which differs from the email address that you have checked.
  • You have used an invalid or non-existing email address when you completed the order.
  • Our email has ended up in your Spam folder.
  • There may have been a problem with the email server, either our or your.

Possible solutions:

  • Check the Spam folder of your email client.
  • If you have created an account with us, log into your account and check your order(s) as follows:
    > Log into your account, click here.
    > Check your orders: User Menu / Your account & orders / Your orders.
    >
    Click on the order number, then scroll down and click on the download link (this does NOT work for updating your software).
  • If you do not have an account with us, or the above procedure does not work for you:
    > Check the other email address(es) that you may be using.
    > Make sure that the email address which you have used does indeed receive emails (by sending a message to yourself). If not, please contact us for support (provide the ordered product, the order date and the email address that you have used for the order).
  • If none of the above works, please contact us for support and provide the ordered product, the order date and the email address that you have used for the order.

When the install package size exceeds the maximum allowed upload size set by PHP, Joomla! will throw an error and the plug-in package will not be installed.

Cause:

  • The install file size exceeds the configured maximum of the PHP upload size of your website or ISP.

Solution:

  • If you have access to the PHP configuration, increase the settings of upload_max_filesize and post_max_size in the file php.ini, OR contact your ISP to do this for you.
    This is the recommended solution, because the install package size is not really that big, so you will likely experience this problem with other extensions as well, sooner or later.
  • Workaround if the above solution fails: remove the documentation (PDF) files from the installation (ZIP) file and retry. Make sure to keep a copy of the original installation file!

Though this is not directly related to errors and trouble, we'd thought it would be wise to mention it anyway.

After having installed and enabled the plug-in (see documentation), you should check - BEFORE you log out from the back-end - whether you will not be locking yourself out from the front- and back-end:

  • While leaving the back-end open, open the website's home page (front-end) in a separate tab or window, for example by clicking the Preview or View Site link at the top of the back-end page.
  • Log into the home page (front-end), not necessarily as an administrator, and log out again.
  • If you see no errors upon logging in or out, you are OK. You may log out from the back-end.
  • If you see errors upon logging in or out, disable both the Login One! authentication and user plug-ins and enable the standard Joomla! authentication and user plug-ins instead. The Login One! plug-in is not functioning correctly.

You can't get access and you are seeing a notice telling you that your username/password are wrong or that you do not have an account.

Possible causes:

  • You have most likely not carried out the installation check mentioned under 3.
  • If you see an error saying "Could not load authentication libraries", you have probably disabled the standard Joomla! authentication plug-in while not having enabled the Login One! plug-in.
  • You are not using the latest version of the plug-in.

Possible solution:

  • If you are still logged into the back-end, it's your lucky day. Check the version of the plug-in and update both the athentication and the user plug-in if necessary. Then make sure that both the Login One! authentication and user plug-ins are enabled.
  • If you have logged out from the back-end and can't get back into the back-end, there is no other way than to regain access by directly editing the MySQL database of the website, see Regaining back-end access after lock-out. After this, you can enable the Login One! authentication and user plug-ins through the back-end.

Even after waiting ages for the other session to expire, you can't get access to your website and the Login One! plug-in continues to notify you that multiple log-ins are not allowed.

Possible causes:

  • Another session using the same user credentials is still open and the other session is either still active or the website has been configured with a very long session life time.
  • The website does not have the overrides installed and the standard Joomla! install keeps the other session alive even if it's not active any longer (see here for more info about this behaviour).
  • You are not using the latest version of the plug-in.

Possible solutions:

  • Reduce the session life time in the website global configuration.
  • Check the version of the plug-in and update both the athentication and the user plug-in if necessary.
  • Install the overrides (Premium and Business Editions only). The Login One! freeware editions do not have the override option.

The following applies to the Business Edition only.
Despite that you have configured the 'maximum allowed sessions' to a value of 2 or greater, the plug-in is blocking all multiple log-in attempts.

Possible cause:

  • You have not configured any allowed user groups, meaning that no user groups and therefore no users are allowed to have multiple log-ins. This is the default behaviour of the plug-in.

Solution:

  • Configure the option named 'Allowed user groups' (near the top) and select there which user groups will be allowed multiple log-ins according to the set 'maximum allowed sessions'.
    NOTE: Including the user group 'Public' in the selection will disable the option.

The plug-in is rightfully denying access to multiple log-in attempts, but the notification that multiple log-ins are not allowed is not displayed at the front-end.

Possible causes:

  • Your website is using a template that does not have the system messages included correctly.
    If the website is using the standard Joomla! login module, you can check this by logging in while using 'gibberish' credentials, e.g. username xxx and password xxx. You should see a message saying that your credentials are wrong. If not, the front-end template is likely the problem.
  • It is not the Login One! plug-in but some other extension that is denying access.

Possible solutions:

  • Modify the template to properly include system messages.
    The body should include the code <jdoc:include type="message" />
  • Enable the standard Joomla! authentication and user plug-ins. Then disable the Login One! plug-ins (both authentication and user) and check again.

Possible cause:

  • The user being blocked has been assigned to two or more User Groups and the option User Group Priority is set to 'most restrictive'.

Possible solution:

  • Allow multiple log-ins to the other User Group(s) as well, OR set the related User Group Priority to 'least restrictive'.

Possible causes:

  • The authentication plug-in has not been enabled/published.
  • You have not disabled the standard Joomla! authentication plug-in.
  • You are using a Super User account. Super Users are never blocked.
  • You are not using the latest version of the plug-in. Check the version of the plug-in and update both the athentication and the user plug-in if necessary.
  • The plug-in scope has been set incorrectly, for example to 'back-end only'.
  • Your account has been allowed multiple log-ins, see plug-in configuration.
  • You are logging in from the same workstation while the plug-in Strict Mode has been set to NO.
  • The authentication plug-in is not fired first; put it at the top of the plug-in list.
  • Something went wrong during plug-in download and/or installation: download and/or install both plug-ins (authentication and user) again.

Possible causes:

  • The Joomla! Session Handler configuration has been set to "PHP" or "None".
  • You have changed the plug-in configuration while a user was logged in.

Possible solutions:

  • Set the Joomla! Session Handler to "database" (Back-end admin / Global config / System).
  • Allow for some time for a new configuration to settle.

Possible cause:

  • The installed Joomla! update has probably changed the user log-in/log-out process in a way that is not compatible with the Login One! plug-in. For this reason, we recommend to always check and update the plug-in BEFORE updating the Joomla! core.

Possible solution:

  • If the plug-in is now locking you out from the back-end (you see an error or the notice that your credentials are wrong), try to get access to the back-end through a Super User account. If this does not help, then see under Regaining back-end access after lock-out.
  • If the plug-in is not locking you out from the back-end, but is merely performing incorrectly, then check for plug-in updates and install the latest updates if available. If things are still not OK, you may check the other cases in this guide, or have a look at the plug-in documentation, or have a look at the forum, or contact us for support (Premium and Business Editions).

Possible causes and solutions:

  • This is the correct behaviour of the Standard (freeware) Edition

The following is for the Premium and Business Edition only:

  • You have not installed the so-called override or the current override has become inactive because you have updated the Joomla! core software. Log into the front-end with Super User credentials, then log out and try again with the other account. If this doesn't work, uninstall and re-install the Login One! override, see documentation.
  • The current override may have become inactive because you have installed/updated a 3rd party login extension. Uninstall and re-install the Login One! override, see documentation.

The following applies to the Business Edition only.
You have configured the plug-in notification to NOT show the notification part 2 that specifies the remaining waiting time; despite this, the message is still being shown.

Possible cause and solution:

  • This option has been introduced with Joomla! 2.5.28 and was bugfixed in plug-in version 2.5.1. Solution: Update your Joomla! to v2.5.28 and the plug-in to version 2.5.1 or later.

If all the above does not apply or has not solved the problem, then you may want to try this.

Possible causes:

  • Your Joomla! install may be using the PHP Session Handler.
  • Your PHP version is outdated.
  • You have changed the plug-in configuration while a user was logged in.
  • There is a bug in the extension.

Possible solutions:

  • Check how the Joomla! Session Handler has been configured. The setting can be found (and changed) at the back-end under Global Configuration / tab System / Session Settings.
    If you set the Session Handler to 'Database', the problem may be gone. If the Session Handler has already been set to 'Database', then do NOT change it.
  • Use a newer PHP version. Many ISPs provide an option in their admin panel to select the PHP version.
  • Allow for some time for a new configuration to settle.
  • Please contact us and tell us what you have observed. Do not forget to include your Joomla!, PHP and extension edition and version.

If you are using the Standard (freeware) Edition, you can skip this, because the freeware edition does not have the Login One! override.

  • Log into the front-end with user credentials that are not allowed simultaneous sessions.
  • Log into the front-end website with the same user credentials but using a different browser.
  • You should see a notification saying that the second log-in has been denied.
  • If the last sentence of this notification specifies a waiting time (in minutes), then the Login One! override is active.

    Note: The plug-in scope configuration must include the ‘front-end’.

This is a last-resort option, if anything else has failed.
You will need MySQL access to the database of the involved Joomla! website.

  • Use MySQL Admin, phpMyAdmin or another MySQL program to connect to the website database.
  • Open the table named prefix_extensions. The word prefix will have been replaced by some code.
  • Look for the extension named plg_authentication_joomla , get into the edit screen for this record and set the enabled field to 1. Save the record.
  • Next, look for the extension named plg_user_joomla , get into the edit screen for this record and set the enabled field to 1. Save the record.

You have now re-enabled the standard Joomla! access plug-ins. Try if you can get access to your website.

If you still can't get access, then you must additionally disable the Login One! plug-ins in a similar procedure:

  • Connect to the Joomla! database and open the table named prefix_extensions.
  • Look for the extension named Authentication - Login One! (or similar), get into the edit screen for this record and set the enabled field to 0 (zero). Save the record.
  • Look for the extension named User - Login One! (or similar), get into the edit screen for this record and set the enabled field to 0 (zero). Save the record.

Your website has now been configured as if the Login One! plug-ins have not been installed.
If you still have no access, front- or back-end, the problem lies somewhere else, i.e. not with the Login One! plug-ins.

If you feel that a useful feature is missing from the plug-in or if you have a suggestion, please contact us.

  • When you contact us, please tell us which product is concerned and describe the feature or suggestion. Include some level of detail (what should the feature/suggestion do and how would it help you?).

If you are experiencing an issue that is not listed in this guide, please contact us.

  • When you contact us, please tell us which product and Joomla! platform (J25 or J3) is concerned and describe the issue/problem that you are encountering. Include some level of detail (what were you trying to do and what was the response?). Just saying 'It does not work' is a complete waste of your time.
  • For the paid editions (Premium and Business) we ask you to also include your Order Number (or the purchase date) and the Order Email (the email address that you used when purchasing the plug-in).


18 Dec 2018

GlobeWeather moduleBasic install and setup instructions for GlobeWeather for Joomla! 2.5

This information is to be considered a basic guideline for the standard edition and is provided 'as is', without any form of warranty or guarantee.
Your Joomla! installation and setup may be different from the basis for these instructions.

Instructions are also included in the module's download package.

Install and upgrade via Joomla! back end. Your settings will be kept.
Javascript must be enabled and up-to-date. 

1. Prepare yourself
Find the weather station ICAO code(s) of the location(s) you wish to display. The ICAO code consists of four alphabetic characters.
If your location is not listed, choose a nearby location.

> Worldwide metar code list
The ICAO code is in the column next to the station's name/description.
Please note that there may be obsolete entries in the list, i.e. stations that do not any longer transmit usable metar data.
The most recent version can be viewed here.


2. Module Manager / Basic Options
Enter the station code(s) of your location(s) at "Metar stations". Separate by commas. Remember the number of stations that you have entered.

Enter the name or descriptions of your stations at "Metar stations description". Separate by commas and make sure the number of descriptions equals the number of stations.

Enter the time zone vs UTC (GMT) for each station. Use the time zone without daylight saving time. Separate by commas and make sure the number of time zones equals the number of stations. For stations at UTC time, e.g. London, enter a 0 (zero).

Select the time offset of your local time relative to UTC. Correct here for daylight saving time if applicable. If you are building a website for a different time zone than your own, use your client's time zone as the basis for this setting.

GlobeWeather Standard module options
   

3. Module Manager / Advanced Options
At first instance, leave the "Metar retrieval mode" to its default setting (HTTP).
If the data continue to take long to load, try to change it to FTP.
If you get a data transfer error, first check your read/write permissions (see under 5). If the problem persists, then change this setting to FTP and try again.

Some ISPs block either HTTP or FTP transfer (or both?). Contact your ISP if neither retrieval mode appears to work.

The Premium and Business Editions offer many more configuration options. See here.

Tip: For the station selector submit button, you can configure either "black" or "white", depending on the background colour of your webpage.

GlobeWeather Standard module advanced options
   

4. Module Manager / Details
Publish the module and assign its position in your template.
Finally, assign the module to the appropriate pages.

Save the module settings.

GlobeWeather Standard module details 1GlobeWeather Standard module details 2
   

5. Frontend / Test GlobeWeather

GlobeWeather will try to set the metar cache permissions by itself. If you see a GlobeWeather error message related to the metar cache, please read the instructions in the documentation that comes with the downloaded package.

MambWeather Classic iconGlobeWeather icon Klear KweatherGlobeWeather icon SerradinhoGlobeWeather icon Tick

Enjoy !!

USAGE NOTES

After you installed the module and set your parameters, it may take a while before you see the desired output, due to metar data retrieval, cache and browser settings.
Be patient. It may take up to 30 minutes before your weather data are shown properly. You may help the process by clearing both the Joomla! and browser cache and by closing and refreshing your browser.
Weather station metar data are generally updated twice an hour.

Sunrise and sunset times
You will have to periodically adapt the sunrise and sunset times to the season of the year, that is if you want to keep the day/night icons realistic. This regular adjustment (Basic Options) is not necessary with the Premium and Business editions which will automatically calculate and adjust the sunrise/sunset times (AutoCalc).

Warning icons
DisconnectedIf you see an "unplugged" icon, with temperature indicating "---", the weather data file may have become corrupt or no weather data are available for the station. Some stations in the ICAO list do not (any longer) provide usable metar data.
GlobeWeather will re-load the involved data file(s) every 5 minutes. If the problem persists, the station is most likely not providing usable metar data. If all stations show an "unplugged" icon, you may need to change the metar retrieval mode (HTTP or FTP, see under 3).

Broken calendarWhen a station has a metar available, but has not updated it within an acceptable period, you will see the latest weather data with the weather icon overlayed by a broken calendar. The event may remain unnoticed if you have decided not to display the weather icon.

A troubleshooting guide is here.

ABOUT LANGUAGES

Frontend languages:
A language pack can be downloaded here.

Backend languages:
English only.

Hello spam click here